|
How to
make Wooden
Flowers
By
Tom Hight
Northwest Oklahoma Woodturners
Wooden flowers make great gifts for
Mother’s Day, Valentine’s Day, and many other occasions. They
are easy to make and are very appreciated by the recipient.
They look nice in bunches or as a single flower. They can be
all one size or many sizes. They also look nice displayed in a
vase. Let’s get started and make some flowers.
|
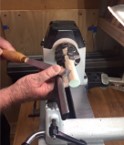
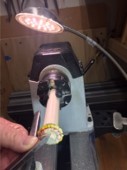
1. Start with a
dowel about 4 to 4½” inches in length. Use the
skew chisel to true the dowel, so the flowers don’t come
out lopsided. For larger flowers use 5/8”, 3/4” or 7/8”
dowels. For smaller flowers use 5/8” or 1/2”
dowels. I normally use Poplar dowels because they
are softer and turn easily. |
|
 |
| |
|
|
|
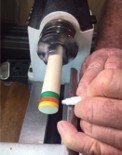
2. Use permanent
markers to color the end of the dowel. When
coloring, hold the tip of the marker slightly downward.
Orange will be the color of the underside of the petals,
and yellow will be the color of the top of the outer
petals. Green will eventually become the color of
the bud.
|
|
 |
| |
|
|
|
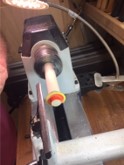
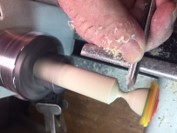
3. Use
the short end of the skew chisel on the end grain of the dowel. Get
a cut about 1/16” started and push the cut back on the dowel about
1/2”. This will create the outer petal ring.
|
|
 |
|
|
|
|
|
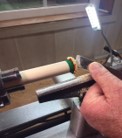
4. With
the lathe running, color the outside petals yellow. It will look best
if you color all the wood leaving no bare wood showing. After coloring the
outside petals, color the rest of the dowel orange. This will become
the primary color for the rest of the flower. |
|
 |
|
|
|
|
|
5. Again,
using the short end of the skew, get a 1/16” cut started at the end
of the dowel and form
the next row of petals. Color the petals and tip of the dowel
as you go.
Continue this process until the whole flower is covered with petals. |
|
 |
|
|
|
|
|
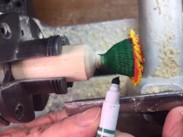
6.
After the petals have been formed, color the center of the flower
yellow (the same color as the outside petal ring). |
|
 |
|
|
|
|
|
7. After
completing the top of the flower, use a small detail or spindle
gouge and form the bud portion of the flower to an ogee shape. Leave
the portion that will become the stem about one-quarter inch in diameter. |
|
 |
|
|
|
|
|
8.
Texture and color the bud portion of the flower green at
this time. |
|
 |
|
|
|
|
|
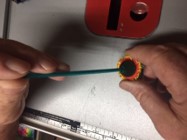
9. After
parting off the flower, use a push pin and create a center point in
the bud. Then drill a 1/16” hole about ¼” deep for the 14-gauge wire
that will form the stem for smaller flowers. For larger flowers use
this 1/16” hole as a pilot hole for a 5/32” drill bit. This will
accept the Dand-o-line wire (from Ace hard ware) wire that becomes
the stem. |
|
 |
|
|
|
|
|
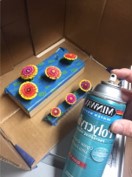
10. After
making all the flowers for the bouquet, spray a finish on them. I
used a water-based polyurethane finish. Apply at least three coats
of finish to the flowers. This will help strengthen the petals. |
|
 |
|
|
|
|
|
11. After
the flowers have dried, cut and epoxy the wire that forms the stem
onto the flower. I use a five minute epoxy. |
|
 |
|
|
|
|
|
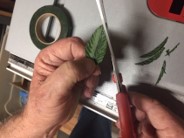
12.
I found some leaves at Hobby Lobby. They were a
little too big for the flowers I was making, so I
trimmed them down to size. |
|
 |
|
|
|
|
|
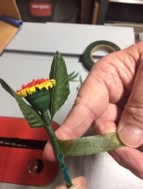
13.
Cut off about 10” to 12” of wrapping tape and wrap that
around the stem adding in the leaves about one inch
below the flower. |
|
 |
|
|
|
|
|
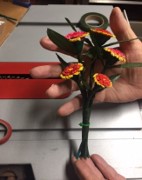
14. After
all the stems have been wrapped with tape, form them into a bouquet,
leaving some higher and some lower. A plastic wire tie can hold them
together. |
|
 |
|
|
|
|
|
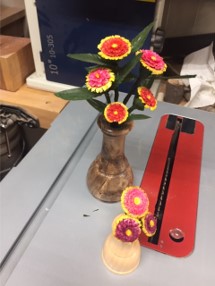
15.
I turned a bud vase about 6” to 8” high and drilled a ¾”
hole in the top to accept the bouquet of flowers.
I don’t add leaves to the smaller flowers because there
isn’t enough room. |
|
 |
For more
information, you can watch “Turning Wooden Flowers on the Lathe” by
Stuart King, or “Flowers for Mother’s Day” by “Tiny Trailer
Workshop”, on Youtube.
Supplies Needed:
·
Dowels from ½” to 1¼” or small tree limbs from 4” to 5” long
·
Permanent markers
·
Water based spry polyurethane
·
5-minute epoxy
·
Dand-o-Line Wire (from Ace)
Tools Needed:
·
Skew chisel
·
3/8” spindle gouge
·
Thin parting tool
Hacksaw
|