|
HOW TO MAKE
LIDDED CONTAINERS
“BOXES”
by
Dewayne Colwell
Northwest Oklahoma Woodturners Association
Lidded Containers or “Boxes” make great gifts to give to family or friends
on special occasions. They are easy to make and don’t take much time. They
are small and can be made from common woods or exotics. They can be
decorated or simply left plain. They look nice either way. Let’s get
started.
1.
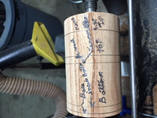
Select a piece of wood that you would like to use. Do not to use
very soft or punkey woods. They tend to be a problem when you
hollow. Your wood piece needs to be about one inch longer than the
height you would like your project to be when finished. Try not to
make your box too deep. The deeper they are the harder they are to
hollow. You will turn the wood as a spindle turning which means the
long grain is running parallel with the ways of the lathe.
|
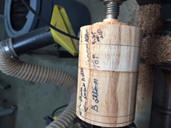
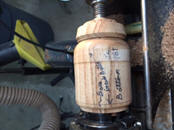
2. First, mill
the wood you have selected so it is square and cut to the length you
desire. I used a block of wood about 2 7/8” x 5”. This
size seems to work well. Mark the centers on each end of the
work piece. Using a set punch or awl make a divot in the center of
each end. |
|
|
3. It is now
time to mount the work piece between centers on the lathe, using a
spur drive or safety drive and the live center. Turn the work
piece into a cylinder using a roughing gouge. Using a skew,
cut small dovetail tenons on each end of the cylinder.
|
 |
|
4. To know how large to cut the tenons, close the #2 jaws on
the chuck, then open them so that there is about a 1/8” gap between
each of the jaws. Measure the inside diameter of the jaws.
This diameter is how large the tenon diameter needs to be. It
is also important not to make the tenon too long. You should
measure the depth of the dovetail jaws and cut the tenon just short
of this measurement.
|
 |
|
5. It is now
time to remove the work piece from the lathe. Using a knockout
bar, remove the safety drive or spur drive from the lathe.
Place the chuck onto the lathe. Mount the work piece in the chuck.
I use the tailstock and live center to help center the work piece.
With the work piece centered, tighten the chuck. It is
sometimes necessary to true up the work piece so it is running true,
not out of round.
|
 |
|
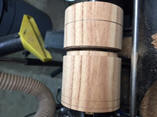
6. It is now
time to determine which end is going to be the top and which end is
going to be the bottom. If your project is going to have very much
height, you should make the bottom about 2/3 of the total finished
height, leaving about 1/3 the total height for the lid. If you are
going to incorporate a fennel or knob on the top you will need to
leave enough wood on the top section to do that. Where the top meets
the bottom of your project, mark a 5/16” place for a tenon and room
to part the two pieces. |
 |
|
7.
Using a parting tool, cut down to a depth of about 1/8” and 5/16”
wide between the top and bottom of the work piece. This will
become the tenon on the bottom of the project that the lid will sit
over. Leaving a 1/64” space on the top of the project,
separate the top from the bottom using a 1/16” parting tool,
separate the top and bottom.
|
 |
|
8. After
parting most of the way through, I sometimes use a small saw to
complete the operation.
|
 |
|
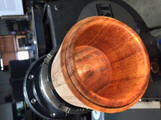
9. Mount the
bottom onto the chuck, and hollow the inside to the desired depth.
Hollow the bottom, leaving about a 1/4” thickness for the bottom of
the project. It is sometimes easier to use a forstner bit to
complete most of this operation. Then you can use a box tool
to finish the inside walls and bottom of the project. Don’t
forget to soften or round over the top of the tenon. |
 |
|
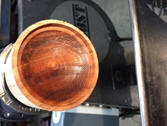
10. You may
sand and apply a finish to the inside of your project at this time.
After the finish has been applied, remove the bottom from the lathe.
|
 |
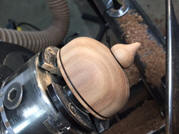
|
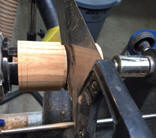
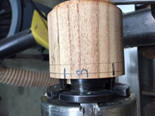
11. It is now
time to hollow the lid. You may do this by using a bowl gouge,
round nose scraper or a box tool. Use the box tool to fit the
lid on the bottom. Don’t make the lid fit too tight on the bottom.
If it fits too tight the person you give it to will not use it.
Also the wood will change shape after a while making the lid almost
impossible to get on and off.
|
 |
|
12. It is now
time to sand and finish the inside of the lid.
|
 |
|
13. After the
lid has been sanded and finished on the inside, it will be time to
reverse chuck, so you can finish shaping the outside. This can
be achieved by either chucking on the inside of the lid that fits
over the tenon on the bottom or building a jam chuck for holding the
lid. You can use the bottom of the box as a jam chuck. |
 |
|
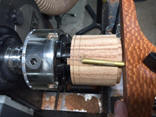
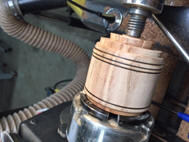
14. After
reverse chucking the lid, it will be time to turn the outside and
shape the knob or finial. It may be desirable to place the
bottom back on the chuck shape and detail the bottom and top as a
unit.
|
 |
|
15. To finish
turning the lid, reverse mount it on the chuck. Then turn the
outside shape. Then shape the knob. I shaped my knob
like a chocolate kiss.
|
 |
|
16. Now you may
sand and finish the outside of the project. The last step is
to finish off the base of the bottom. This can be achieved by
either reverse chucking or building a jam chuck for the bottom.
Sand and finish the base.
|
 |
|
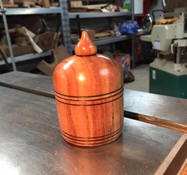
17. The
finished project.
|
 |
|